You’ll want storage that keeps towels, robes, and supplies neat, safe, and within arm’s reach of your cold plunge, whether it’s on a small deck or in a compact bathroom. Choose vertical racks, wall-mounted caddies, and narrow shelving to save floor space, add lockable cabinets for chemicals, and use weatherproof bins outdoors. With a few simple zones and routines, maintenance gets easier and your plunge stays inviting—now consider which setup fits your space and how you’ll arrange it.
Key Takeaways
- Use vertical and multipurpose storage like wall-mounted racks, narrow shelves, and pegboards to maximize limited space.
- Store chemicals in a lockable, ventilated cabinet with labeled containers and an inventory log.
- Keep frequently used items (towels, goggles, timers) on open hooks or labeled baskets within arm’s reach.
- Protect equipment with insulated, UV-resistant covers or shelters and insulate exposed plumbing for freeze protection.
- Deflate and roll inflatable plunges into labeled, ventilated bags and designate drying/cleaning zones to reduce clutter.
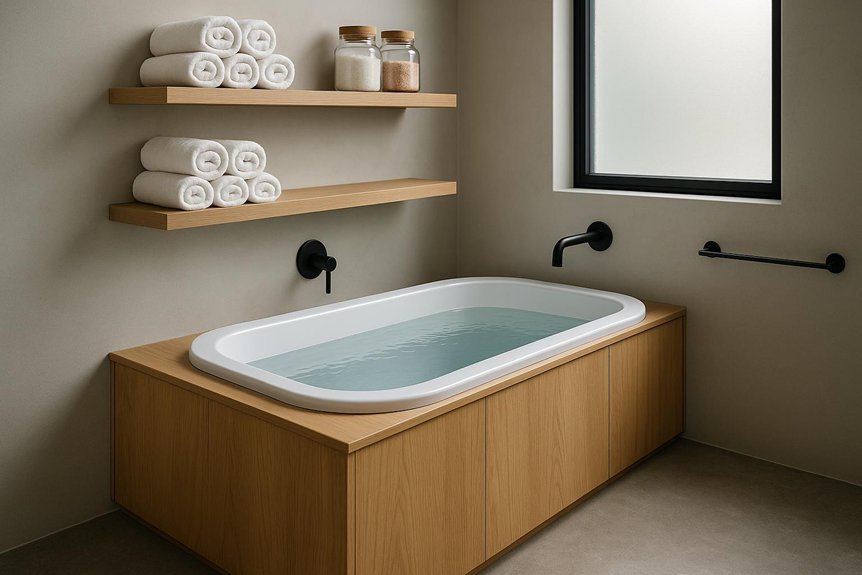
Compact Storage Solutions for Small Decks and Bathrooms
If you’re working with a small deck or a tight bathroom, clever storage can make a cold plunge both practical and attractive without sacrificing floor space. You’ll want to prioritize vertical and multipurpose solutions: wall-mounted racks for towels and robes, narrow shelving that fits beside the plunge, and hooks that keep accessories off the deck. Consider a bench with integrated storage to seat, store chemicals in sealed containers, and hide insulating covers when not in use. Use stackable, ventilated bins for filters and maintenance tools, labeling each for quick access. Magnetic strips or pegboards mounted nearby hold metal tools neatly. Even in confined spaces, thoughtful placement, durable materials, and moisture-resistant finishes keep the area organized, safe, and visually uncluttered.
Weatherproof Options for Outdoor Plunge Tubs
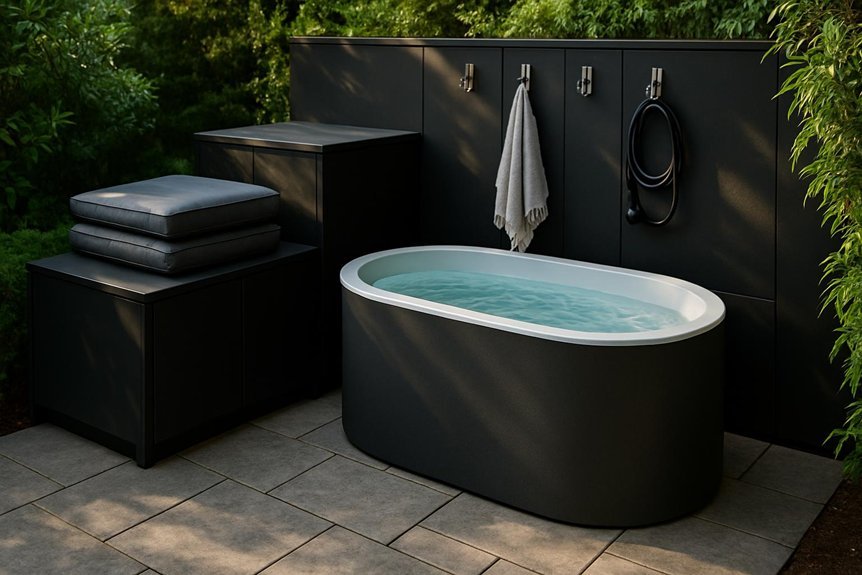
When you place a plunge tub outdoors, choosing a UV-resistant shelter like a pergola with UV-rated fabric or a hard canopy will protect the material and maintain water clarity. You should also plan freeze-protection strategies — insulated covers, a small heater with thermostat, or seasonal draining — to prevent damage during cold snaps. Balancing shelter choice with practical winter measures lets you enjoy the tub longer while reducing maintenance and repair costs.
Uv-Resistant Shelter Options
Because prolonged sun exposure can degrade materials and shorten the life of an outdoor plunge tub, choosing a UV-resistant shelter is crucial for protecting your investment and preserving performance. You’ll want shelters made from UV-stabilized materials like polycarbonate panels, marine-grade canvas, or treated wood with UV-blocking finishes; each offers different balances of durability, light transmission, and aesthetics. Consider a pergola with polycarbonate roofing for filtered light and strong UV protection, or a pop-up canopy with UV-rated fabric for seasonal flexibility. Ascertain seams, fasteners, and mounting hardware resist corrosion and block sun at low angles. Ventilation and airflow are important to prevent heat buildup under the shelter, so include vents or adjustable sides. Finally, check UV ratings and warranties to compare real protection levels.
Freeze-Protection Strategies
Although outdoor plunge tubs offer year-round recovery and relaxation, you’ll need deliberate freeze-protection strategies to prevent damage from ice and subfreezing temperatures; thoughtful weatherproofing preserves plumbing, pumps, and shell integrity while minimizing maintenance and repair costs. You should insulate exposed plumbing with foam sleeves and heat tape, routed to a GFCI-protected outlet, to keep water lines from freezing. Consider an insulated, lockable cover or thermal blanket to reduce heat loss and block debris, and pair that with a snug-fitting shelter or removable enclosure that breaks wind and traps warmth. For extreme cold, install a low-wattage tank heater or thermostatic circulation system that prevents standing ice without overheating. Finally, establish a winter checklist for monitoring temperature, water level, and equipment performance regularly.
Space-Saving Ideas for Inflatable and Portable Plunges
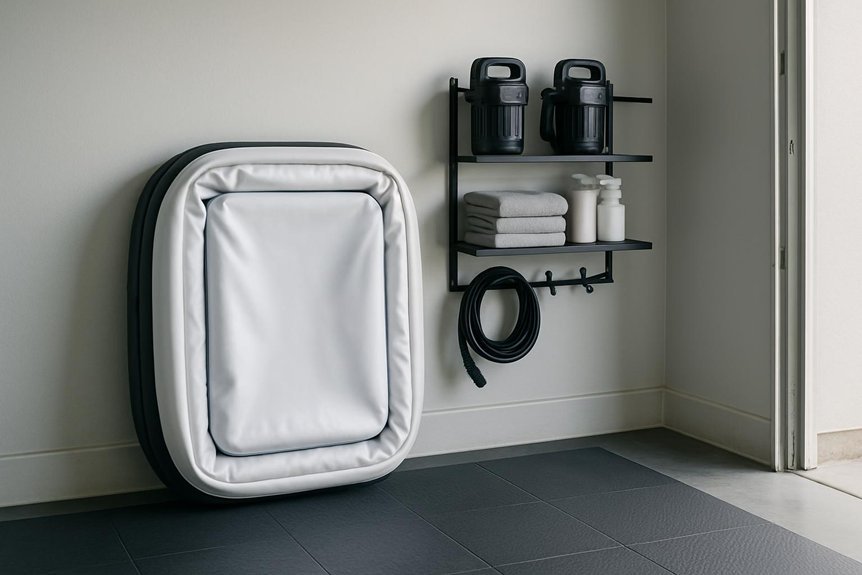
If you live in a smaller home or apartment and want the benefits of cold therapy without sacrificing floor space, inflatable and portable plunges offer clever storage advantages that make them practical year-round. You can deflate and roll these units, then tuck them under a bed, behind a couch, or inside a closet on a low shelf, saving valuable square footage. Consider a labeled, ventilated storage bag to protect material and speed setup, and use a lightweight folding dolly or carry straps to move the filled unit safely. If you keep it outdoors seasonally, store components in a watertight bin elevated off the ground to prevent moisture damage. Routine rinsing and thorough drying before storage extend lifespan and keep odors at bay.
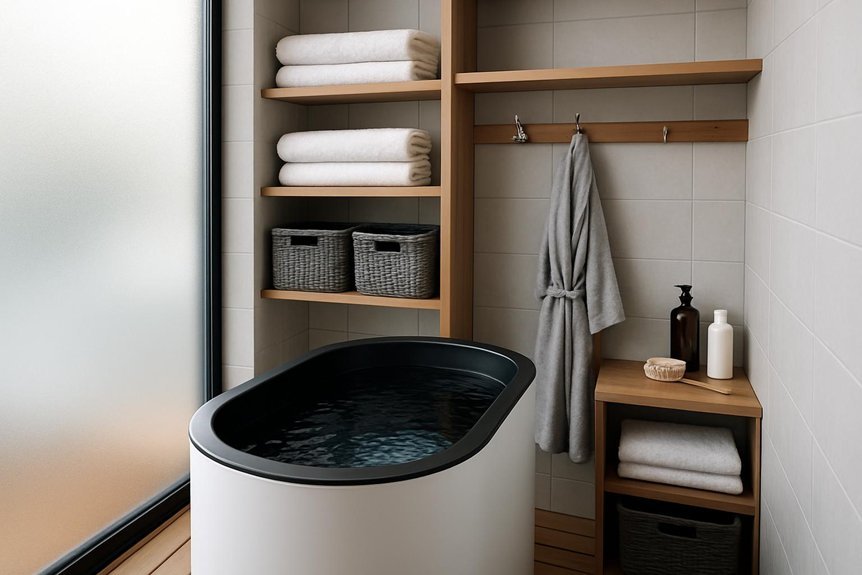
Stylish Shelving and Caddies for Towels and Robes
Storing an inflatable plunge under a bed or in a closet frees up floor space, but you still want quick access to warm towels and a robe when you step out, so smart shelving and caddies pull the whole setup together. Choose open shelving with moisture-resistant finishes so airflow reduces dampness, and position shelves at reachable heights to avoid dripping down a hallway. Use woven or plastic caddies for folded towels; they slide onto shelves and can be labeled for size or frequency of use. Add a hook rail or wall-mounted robe rack near the exit point to keep robes accessible without cluttering the floor. For a tidy aesthetic, pick coordinated colors and materials that match your bathroom or storage area, balancing function and style.
Safe Chemical and Maintenance Supply Storage
Keep your pool and maintenance chemicals secure by installing a lockable chemical cabinet, so you control access and reduce the risk of accidental exposure. Pair that with a ventilated shelving unit to prevent fumes from building up and to keep containers dry and stable, and be sure each bottle is in a clearly labeled container with hazard information and expiration dates. With these measures in place you’ll protect family and guests while making routine upkeep safer and more efficient.
Lockable Chemical Cabinet
Because pool and spa chemicals can be both corrosive and hazardous, you should store them in a dedicated lockable chemical cabinet that keeps products secure, segregated, and ventilated; this prevents accidental access by children or pets and reduces the risk of dangerous reactions between incompatible substances. Choose a cabinet constructed from corrosion-resistant materials with clearly labeled compartments for oxidizers, acids, and alkalis, and keep original containers intact to retain safety information. Use secondary containment trays to catch spills and install a simple lock that limits access to responsible adults. Place the cabinet away from heat sources and direct sunlight, and maintain an inventory log with purchase dates and expiry information. Regular inspections guarantee seals and labels remain legible and the cabinet functions safely.
Ventilated Shelving Unit
A ventilated shelving unit gives you a practical, safe place to organize cold plunge chemicals and maintenance supplies while reducing vapor buildup and moisture accumulation; choose a unit made from corrosion-resistant materials like stainless steel or heavy-duty plastic, with slatted or perforated shelves that promote airflow and prevent liquid pooling. Position the unit in a cool, well-ventilated area away from direct sunlight and heat sources, and leave space behind and above the shelves for circulation. Use adjustable shelves so you can separate bulky items from small bottles, keeping heavier containers lower for stability. Install spill trays on lower shelves and consider raised feet to avoid floor moisture. Secure the unit to the wall for safety, and inspect it periodically for corrosion, leaks, or trapped residue.
Clearly Labeled Containers
After organizing supplies on a ventilated shelving unit, you’ll want to sort chemicals into clearly labeled containers so you can find what you need quickly and reduce the risk of accidental misuse or mixing. Use durable, chemical-resistant bottles or bins with printed labels that include the product name, concentration, hazard symbols, and date opened. Color-code labels or caps for categories like sanitizers, pH adjusters, and metal cleaners to speed identification, and store incompatible items apart. Keep a master inventory checklist nearby, updating it when you add or remove supplies, and include brief handling notes for emergencies. Secure lids tightly and place volatile or strong-smelling chemicals on lower shelves in spill trays. Regularly inspect labels for legibility and replace faded tags promptly.
Wall-Mounted and Over-Tub Organization Systems
When space is tight and you want quick access to towels, thermometers, and maintenance tools, wall-mounted and over-tub organization systems give you a compact, efficient way to keep essentials at hand and off the floor. You can install slotted rails, magnetic strips, or pegboards above the tub to hang brushes, straps, and small containers, freeing room around the plunge. Over-tub caddies and adjustable trays clip to rims or hook to edges, holding bottles and a waterproof timer within arm’s reach. Choose rust-resistant materials and secure fastenings to withstand humidity and occasional splashes. Labels, modular bins, and removable hooks let you reconfigure storage as needs change, while installing at ergonomic heights reduces bending and keeps your routine smooth and safe.
Tips for Keeping Essentials Accessible and Clutter-Free
Smart placement and straightforward routines will keep your cold plunge area both accessible and clutter-free, building on the space-saving wall and over-tub systems you just read about. Place frequently used items—towels, robes, goggles, and thermometers—within arm’s reach on open hooks or narrow shelves so you won’t fumble after a plunge. Use labeled baskets or clear containers for smaller essentials like earplugs, creams, and spare batteries; labels speed retrieval and encourage return. Schedule a quick tidy after each session: hang damp items to dry, wipe splashes, and toss rubbish. Rotate supplies monthly to discard expired products and consolidate duplicates. Finally, keep a small tray for keys and phones away from water, and maintain consistent zones for storage, cleaning, and drying to reduce clutter over time.
FAQ
Can Cold Plunge Covers Support Seating or Heavy Objects?
Can I sit on my cold plunge cover?
Generally, no. Most cold plunge covers are not designed to support weight and should not be used for seating.
Are cold plunge covers able to hold heavy objects?
No, cold plunge covers are primarily made for insulation and protecting against debris. They should not be relied upon to support heavy objects.
What should I use if I need weight support on my cold plunge?
For weight support, it’s best to use a specifically rated rigid cover or to add a certified support platform designed for that purpose.
How Do I Childproof a Cold Plunge Area?
FAQ: How can I secure a cold plunge area?
To secure a cold plunge area, install a sturdy, lockable cover and a perimeter fence or gate equipped with a self-closing latch. This helps prevent unauthorized access and keeps children safe.
FAQ: What safety measures should I implement for children around a cold plunge?
It’s crucial to supervise children at all times when they are near a cold plunge. Additionally, consider using alarms and pool-safe locks to enhance safety and ensure they cannot access the area unsupervised.
FAQ: How can I keep chemicals and tools away from children?
Store all chemicals and tools related to the cold plunge in high, secure places that are out of children’s reach. This reduces the risk of accidental exposure or injury while ensuring a safer environment.
Can I Integrate a Dehumidifier With Plunge Storage Solutions?
FAQ: Can I integrate a dehumidifier with plunge storage solutions?
Yes, integrating a dehumidifier with plunge storage is possible and effective.
FAQ: Where should I place the dehumidifier in relation to my plunge storage?
Position the dehumidifier near your gear to maximize its efficiency in removing moisture from the air surrounding your equipment.
FAQ: How should I manage drainage from the dehumidifier?
Ensure that the drainage from the dehumidifier is routed away from the storage area to prevent any water accumulation, which can lead to mold growth.
FAQ: What additional steps can I take to protect my gear from humidity?
Utilize humidistat control, seal storage bins tightly, and ensure proper ventilation in the room to keep your equipment dry and safe from mold.
Are There Insurance Considerations for Outdoor Plunge Installations?
What types of insurance are needed for outdoor plunge installations?
You will require liability, property, and potentially umbrella insurance to protect against various risks associated with outdoor plunge installations.
Are there specific safety requirements that insurers may demand?
Yes, insurers may require safety measures such as fencing, locks, non-slip surfaces, and appropriate signage to minimize risks and ensure compliance.
What should I do to ensure proper insurance coverage for my plunge installation?
It’s important to document ongoing maintenance, obtain the necessary permits, and notify your insurance agent about your plunge installation to guarantee you have the right coverage in place.
What Are Recommended Storage Ideas for Plunge Energy-Saving Accessories?
FAQs on Recommended Storage Ideas for Plunge Energy-Saving Accessories
1. How should I store energy-saving accessories to protect them from the elements?
Energy-saving accessories should be stored in weatherproof bins placed on a raised shelf. This will help keep them dry and safe from moisture or pests.
2. What is the best way to organize cords and cables?
Mounting hooks for cords is an effective way to keep them organized and untangled. This method allows for easy access and prevents wear on the cords.
3. Where is the best place to store batteries?
A ventilated cabinet is ideal for storing batteries as it helps prevent overheating and prolongs their lifespan. Ensure the cabinet is easily accessible for quick replacements.
4. How can I keep track of the energy-saving accessories I use?
Maintaining a simple inventory list that you update after each use is a practical way to track your accessories. This helps avoid unnecessary energy waste by ensuring you know what you have on hand.
Final Thoughts
You’ll get the most from your cold plunge by combining smart storage with safety and routine: use vertical racks, narrow shelving, and wall-mounted caddies to keep towels and robes organized; choose weatherproof bins and lockable cabinets for outdoor tubs and chemicals; dedicate a cleaning zone and keep a simple inventory for maintenance supplies. With these strategies, you’ll save space, reduce clutter, and make cold plunging efficient, safe, and consistently enjoyable.