You’ll want to match pump size and turnover to your tub, choose filter media that captures the debris you expect, and plan plumbing so flow sweeps contaminants toward skimmers and returns; set filtration for a 2–4 hour turnover, place equipment for easy access, and establish a weekly maintenance routine for cartridges and chemical balance. Get these basics right and you’ll avoid many common issues — next, we’ll break down pump selection and filter options.
Key Takeaways
- Calculate required pump flow to achieve a full-volume turnover every 1–2 hours, then select a pump rated above that flow at your head height.
- Install a filtration train sized to the pump: coarse pre-filter (50–20 µm), pleated cartridge (10–5 µm), and optional 1–3 µm finish or carbon stage.
- Design plumbing with minimal bends, appropriately sized pipe, isolation valves, and return jet placement to promote gentle surface circulation.
- Place the filter before the heater, mount equipment close to the plunge to reduce head loss, and choose a quiet, serviceable pump.
- Establish a maintenance routine: weekly skimmer/filter checks, biweekly water chemistry tests, and a log for filter changes and troubleshooting.
Choosing the Right Pump and Flow Rate
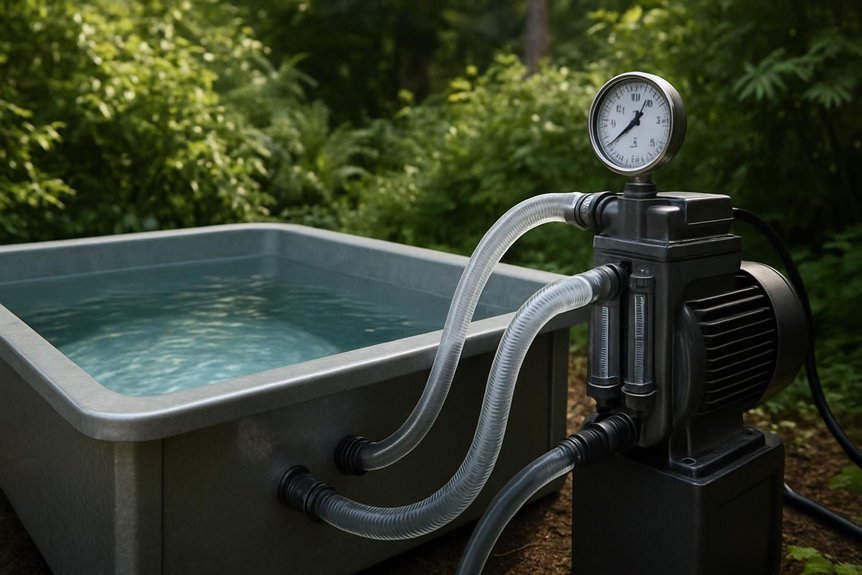
When you pick a pump for your cold plunge, match its flow rate to the size of the tub and the filtration goals you want to achieve, because undersized units struggle to keep water clear while oversized units waste energy and can create excessive turbulence. You’ll calculate turnover rate by dividing tub volume by pump flow; aim for a 2–4 hour turnover depending on usage and contaminants, with higher traffic needing faster circulation. Consider head height and fittings so the pump can deliver rated flow under real conditions, and factor in energy efficiency to limit running costs. Choose a reliable, quiet model with a serviceable impeller and clear performance curves, and plan for future use increases when sizing the system.
Selecting Filter Media and Cartridge Options
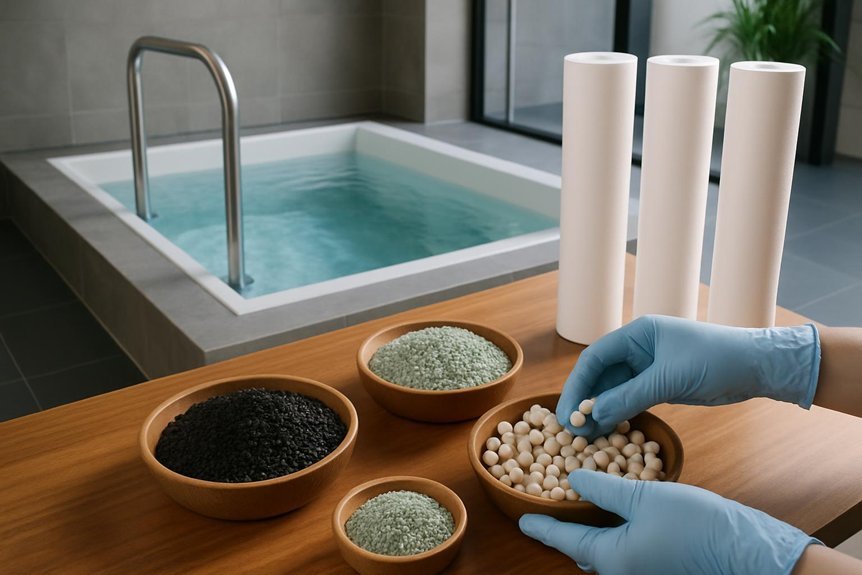
Now that you’ve picked a pump and sized your turnover rate, you’ll need to pair that flow with appropriate filter media and cartridges so the system actually removes the particles and organics that affect water clarity and hygiene. Choose cartridge micron ratings based on expected debris: 50–20 µm for coarse dirt, 10–5 µm for fine particulates, and 1–3 µm when aiming for very clear, near-sterile water. Consider pleated cartridges for higher surface area and longer life, or spun/bag filters for cost-effective coarse filtration. Add a secondary media like activated carbon to reduce organics and odors, or a diatomaceous earth pad for superior fine filtration when needed. Match media to pump flow and plan regular replacement intervals to maintain performance.
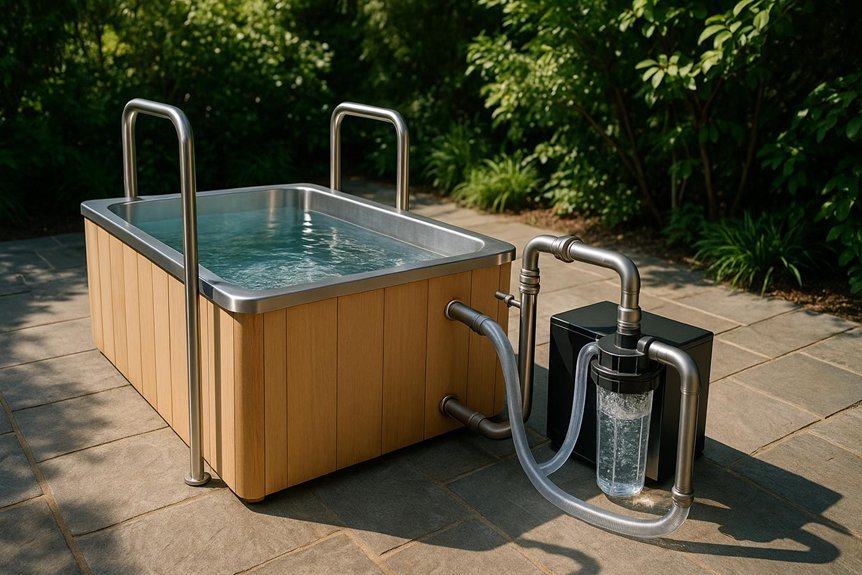
Designing the Plumbing and Circulation Layout
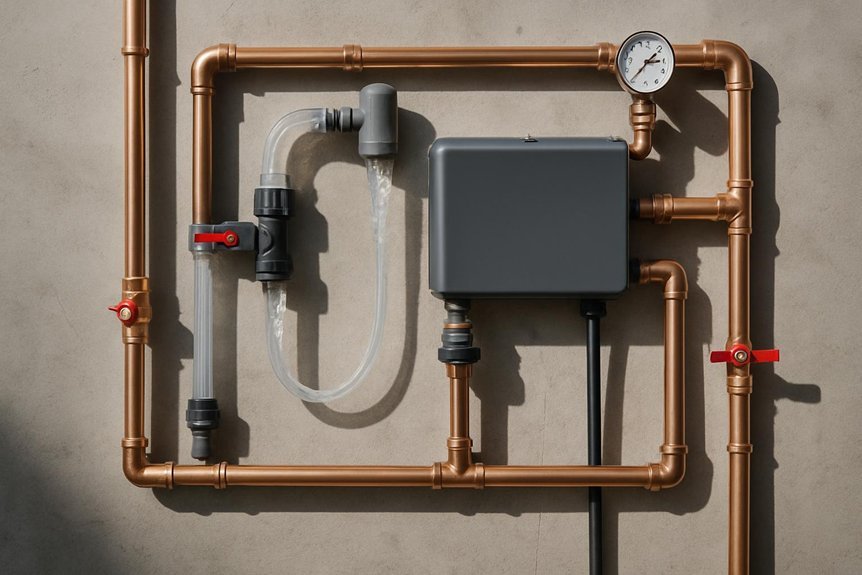
Because the plumbing layout determines how effectively your pump, filter and heater work together, you should plan pipe routing, valve placement and return locations with purpose and care. Begin by creating a simple schematic showing inlet skimmers, drains and return jets so you see flow paths and avoid dead zones. Place valves for isolation and balancing near key components to let you service or throttle lines without draining the plunge. Use straight runs and gradual bends to minimize friction losses, and choose pipe diameter consistent with expected flow to reduce noise and cavitation. Include a dedicated air bleed and easy-access unions for maintenance. Finally, orient returns to promote gentle circulation across the water surface, enhancing filtration efficiency while maintaining comfortable currents.
Sizing Equipment and Placement for Optimal Performance
With your plumbing layout sketched and return jets positioned to promote steady surface flow, it’s time to size the pump, filter and heater so each component matches the system’s hydraulic realities and your usage goals. First, calculate required flow: aim for full-volume turnover every 1–2 hours depending on use intensity; divide pool volume by turnover time to get GPM. Factor head loss from piping, fittings, and elevation to pick a pump curve that meets that GPM at system head. Choose a filter rated slightly above calculated flow to avoid excessive pressure. Place equipment close to the plunge to minimize head loss, on a stable, level pad with easy access for valves and gauges. Position the heater after the filter in the flow path and allow service clearance.
Maintenance Routines and Troubleshooting Tips
While regular care might seem like an extra chore, keeping your cold plunge’s filtration, circulation, and sanitation systems in tune will prevent costly repairs and guarantee consistently clean water you can rely on; this section outlines practical maintenance routines, routine inspection checkpoints, and troubleshooting steps so you can quickly identify and fix common issues. Check filters weekly and replace or backwash per manufacturer guidance; clean skimmer baskets and inspect O-rings for wear. Test sanitizer and pH levels at least twice weekly, adjusting chemicals to stay within recommended ranges. Monitor pump flow and listen for unusual noises; reduced flow often signals clogged lines, trapped air, or a failing impeller. If you see cloudy water, shock and run filtration continuously, then inspect media. Keep a maintenance log to track actions and spot patterns.
FAQ
Can a Cold Plunge Be Used With Saltwater Instead of Freshwater?
FAQs about Using Saltwater in Cold Plunges
1. Can I use saltwater in my cold plunge?
Yes, you can use saltwater in a cold plunge, but it requires specific considerations to ensure proper function.
2. What components do I need for a saltwater cold plunge?
You’ll need corrosion-resistant components, as well as pumps and filters that are compatible with saltwater to prevent damage to the equipment.
3. How do I maintain water quality in a saltwater cold plunge?
Regular maintenance is essential to manage salinity levels, algae, and microbial growth to ensure optimal water quality and prevent equipment deterioration.
How Do I Winterize an Outdoor Cold Plunge?
FAQ on Winterizing an Outdoor Cold Plunge
1. What are the first steps to winterize my cold plunge?
Start by draining all the water from the cold plunge. This prevents freezing and damage to the structure.
2. How do I clean and protect the plumbing system?
Clean all surfaces and plumbing lines, then blow out the plumbing to remove any remaining water. Adding antifreeze to traps will help prevent freezing in the pipes.
3. What should I do with the equipment during winter?
Remove or properly insulate any equipment connected to the cold plunge. This protects it from freezing temperatures and potential damage.
4. How can I secure my cold plunge for the winter?
Cover the cold plunge securely to keep out pests and debris. It’s also important to check on it periodically to ensure nothing is freezing or invading.
Are Ozone or UV Systems Safe for Cold Plunge Use?
FAQ: Are ozone systems safe for cold plunge use?
Yes, ozone systems can be safe for cold plunge use if they are properly sized and installed. However, they should not replace traditional filtration or water chemistry management.
FAQ: Can UV systems be used in cold plunge pools?
Absolutely, UV systems are safe for cold plunge applications when installed correctly. Just like ozone systems, they must be used alongside regular filtration and water quality monitoring.
FAQ: Do I still need to monitor sanitizer levels with ozone or UV systems?
Yes, even with ozone or UV systems in place, it’s essential to regularly monitor sanitizer levels. These systems enhance water quality but do not eliminate the need for proper chemical balance.
FAQ: What maintenance is required for cold plunge systems using ozone or UV?
Regular maintenance includes monitoring sanitizer levels, maintaining filters, and adhering to manufacturer guidelines for operation in cold water. This ensures optimal performance and safety.
What Electrical Requirements and GFCI Protections Are Needed?
FAQs on Electrical Requirements and GFCI Protections
What type of circuit is required for a pump or heater?
A dedicated GFCI-protected circuit is necessary for the pump or heater. The circuit should be sized according to the load indicated on the nameplate, typically ranging from 15 to 30 amps.
What type of wiring is needed for outdoor installations?
For outdoor installations, you must use weatherproof, outdoor-rated wiring. This ensures safety and compliance with local codes, especially in areas exposed to moisture.
Is proper grounding necessary for electrical installations?
Yes, proper grounding is essential for any electrical installation involving pumps or heaters. This helps prevent electrical shocks and ensures the system operates safely.
Who should install the electrical components for these appliances?
It is recommended that a qualified electrician installs the breakers, conduit, and other electrical components. This ensures compliance with local codes and safety standards.
Can I Integrate a Heater Without Affecting Cold Plunge Benefits?
FAQ 1: Can I use a heater with my cold plunge without losing its benefits?
Yes, you can integrate a heater into your cold plunge setup without compromising its benefits. By carefully controlling the water temperature and limiting the heating duration, you can still enjoy the advantages of cold therapy.
FAQ 2: What precautions should I take when heating the water?
To maintain the benefits of cold plunging, ensure precise temperature control, implement rapid cooling cycles, and use proper insulation and filtration. This helps prevent overheating and preserves the cold plunge experience.
FAQ 3: Are there safety measures I need to consider?
Absolutely. It’s essential to have safety interlocks in place to prevent overheating. This will ensure that the water remains at a safe temperature while still allowing for the occasional heating.
Final Thoughts
You’ve now got the essentials to set up an effective cold plunge filtration system: pick a pump that gives a 2–4 hour turnover, choose filter media sized for your debris, and plan plumbing with skimmers and return jets to maximize circulation. Place equipment for accessibility and efficient flow, then keep a routine of weekly filter checks, chemical monitoring, and pump inspections. With consistent maintenance you’ll preserve water quality and extend system life.